How to publish a Microsoft MVC app in a WordPress blog (in IIS7)
August 28, 2011 Leave a comment
If you have a wordpress blog and you wish to publish an MVC application (or probably any other kind of asp application) as a sub-directory of the blog, this post will describe how to do it.
This post assumes that
- You have a WordPress site hosted on a computer you control
- The WordPress site is hosted on a iis7
- You wish to add the MVC app as a subdirectory to the blog
- If you wish to host the blog inside the app instead of the other way around – then this post isn’t for you.
Set your application to appear in a virtual directory
First, make sure that your MVC expects to be placed in a virtual directory. This doesn’t make the application deploy into a virtual directory (that’s the next step), but it makes your application use “/Verktyg” in all it’s urls.
- Select the project
- Select properties
- Select the “Web” tab
- Enter the name of the virtual path in the appropriate box – in this case it’s called “/Verktyg” (which means “Tools” in swedish)
- Test your application, make sure all your links still work.
Make your application deploy to a virtual path
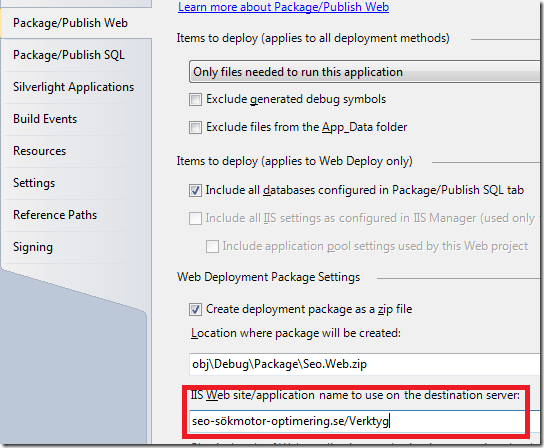
Now you tell your application where on the IIS to deploy – both the web site and the virtual directory.
- Select the project
- Select properties
- Select the “Package/Publish Web” tab
- Enter the name of the site and the virtual path

- Hit save
Build a deployment package
- Select the project
- Right-click on the project
- Select the menu option “Build deployment package”
- Copy the deployment package to the server hosting the IIS 7 server
Configure Web.config on the WordPress site
You must configure the Web.config file of the blog to ignore anything that’s intended for the MVC application.
- By default, the Web.config file of the wordpress site is inherited by the MVC application – that’s something that we don’t want – and that’s fixed by adding a
location
- tag inside the configuration tag. The location tag must have the attribute “
inheritInChildApplications
- ” to false.
<configuration>
	<location inheritInChildApplications="false">
		<system.webServer>
			<rewrite>
				<rules>
					<rule name="wordpress" patternSyntax="Wildcard">
						<match url="*" negate="false" />
							<conditions>
							<add input="{REQUEST_FILENAME}" matchType="IsFile" negate="true" />
							<add input="{REQUEST_FILENAME}" matchType="IsDirectory" negate="true" />
							</conditions>
						<action type="Rewrite" url="index.php" />
					</rule>
				</rules>
			</rewrite>
		</system.webServer>
	</location>
</configuration>
So locate your Web.config file – it’s stored in the same directory as the site;
And add the location tag. Remember to include the closing tag.
Create and configure Virtual path on WordPress site
Before we can install the app, we must make sure that IIS7 has the appropriate Virtual Path (called Verktyg in our example) and that the correct application pool is serving the requests.
- Create a directory for the virtual path
- Open “Internet Information Services (IIS) Manager”
- Select the site;

- Right-click on the site and select “Add application”

- Make sure that the application pool you select uses .NET framework 4.
- Press ok
Install the application
Now it’s time to install the application. As you copied the installation package in one of the previous steps, you should have a directory on the IIS machine that looks something like this;
Running “Seo.deploy.cmd” will install the application – I usually use the /y flag to skip the questions. Actually, for deployment convenience, I typically create two .bat files, one for copying the deployment package from the development machine and one for deploying the new code. That way I can quickly update the application.
1.copy.bat (relies on the fact that I’m using Remote Desktop to access the web server and that I’m sharing my local drives with the web server):
xcopy \\tsclient\C\Dev\Seo\Seo.Web\obj\Debug\Package\*.* package /D /Y
2.install.bat
package\Seo.Web.deploy.cmd /y
Start cmd as Administrator by right-clicking (in the start menu) and selecting “Run as administrator”
Go to the directory where you’ve stored the batch files described above and press “1” and tab – the shell will automatically suggest the 1.copy.bat file;
Press 2 and tab – the shell will automatically suggest the “2.install.bat” – it should look something like this;
If installation fails with the message below “Site ‘Default Web Site’ does not exist” then you’ve failed with the step called “Make your application deploy to a virtual path”. Make sure to build and copy a new deployment package.
Visit the site
You should now be able to visit the site; like this Tools for SEO optimizing – in Swedish.


